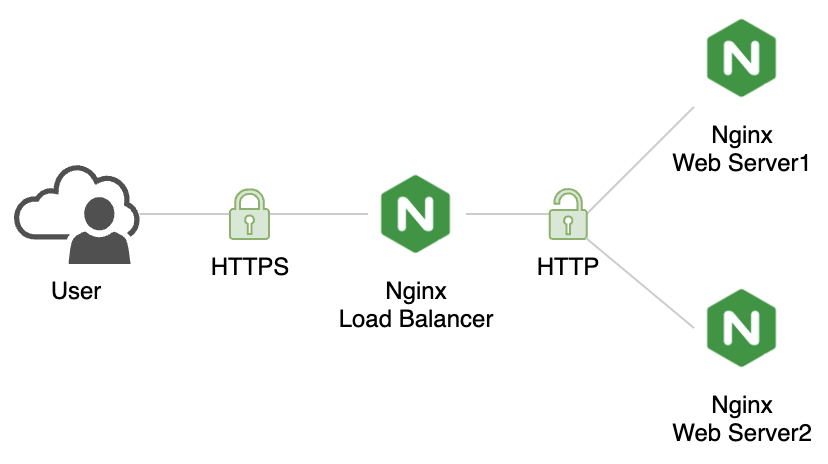
Docker Nginx Load Balancer

Are you looking to set up a Nginx container using Docker on your MacOS machine? Look no further! In this article, we'll walk you through the process of creating and configuring a Docker Nginx container, including setting nginx configuration as Load Balancer, http redirection & ssl/tls termination.
Create Self Signed Certificate
Pre-requisite: openssl must be installed in MacOS
openssl req -x509 -nodes -days 365 \
    -subj "/C=DE/ST=Berlin/L=Berlin/O=appdev24/OU=dev/CN=nginx.demo" \
    -newkey rsa:4096 -keyout selfsigned.key \
    -out selfsigned.crt
-subj switch option:
- Country Name (2 letter code): DE
- State or Province Name (full name): Berlin
- Locality Name (city): Berlin
- Organization Name (company): appdev24
- Organizational Unit Name (department): dev
- Common Name (server FQDN): nginx.demo
Update hosts file
sudo vi /etc/hosts

# Append the server entry
127.0.0.1	nginx.demo
Create Nginx configuration
nginx-loadbalancer.conf
user  nginx;
worker_processes  auto;

error_log  /var/log/nginx/error.log notice;
pid        /var/run/nginx.pid;

events {
    worker_connections  1024;
}


http {
    include       /etc/nginx/mime.types;
    default_type  application/octet-stream;

    log_format  main  '$remote_addr - $remote_user [$time_local] "$request" '
                      '$status $body_bytes_sent "$http_referer" '
                      '"$http_user_agent" "$http_x_forwarded_for"';

    access_log  /var/log/nginx/access.log  main;

    sendfile            on;
    keepalive_timeout   65;


    # HTTP Redirect
    server {
        listen          80 default_server;
        listen          [::]:80 default_server;
        server_name     _;
        return 301 https://$host$request_uri;
    }


    # HTTP Load Balancing
    upstream static {
        server host.docker.internal:8090;
        server host.docker.internal:8092;
    }


    # SSL/TLS Termination
    server {
        listen 443 ssl;
        listen [::]:443 ssl;

        server_name     nginx.test;
        root            /usr/share/nginx/html;
        index           index.html;

        ssl_session_cache   shared:SSL:10m;
        ssl_session_timeout 4h;

        ssl_protocols               TLSv1 TLSv1.1 TLSv1.2 TLSv1.3;
        ssl_ciphers                 HIGH:!aNULL:!MD5;
        ssl_prefer_server_ciphers   off;

        ssl_certificate         /etc/ssl/certs/selfsigned.crt;
        ssl_certificate_key     /etc/ssl/private/selfsigned.key;

        # Proxy
        location / {
            proxy_http_version 1.1;
            proxy_cache_bypass $http_upgrade;

            proxy_set_header Upgrade $http_upgrade;
            proxy_set_header Connection 'upgrade';
            proxy_set_header Host $host;
            proxy_set_header X-Real-IP $remote_addr;
            proxy_set_header X-Forwarded-For $proxy_add_x_forwarded_for;
            proxy_set_header X-Forwarded-Proto $scheme;
            proxy_pass http://static;
        }

        # Basic Status Info
        location /stub_status {
            stub_status on;
        }
    }
}
NGINX offers multiple load balancing methods, including round-robin, least connections, ip hash, etc.
Create Demo Webpage
app1.html
<!DOCTYPE html>
<html>
<head>
    <title>NGINX- Load Balancer</title>
    <meta charset="UTF-8">
    <meta name="viewport" content="width=device-width, initial-scale=1">
    <link rel="stylesheet" href="https://www.w3schools.com/w3css/4/w3.css">
    <style>
        body,
        html {
            height: 100%
        }
        .bgimg {
            background-image: url('https://images.unsplash.com/photo-1451187580459-43490279c0fa');
            min-height: 100%;
            background-position: center;
            background-size: cover;
        }
    </style>
</head>
<body>
    <div class="bgimg w3-display-container w3-animate-opacity w3-text-white">
        <div class="w3-display-topleft w3-padding-large w3-xlarge">
            Docker
        </div>
        <div class="w3-display-middle">
            <h1 class="w3-jumbo w3-animate-top">NGINX</h1>
            <hr class="w3-border-grey" style="margin:auto;width:40%">
            <p class="w3-large w3-center">As Load Balancer</p>
            <p class="w3-large w3-center">Server: static-app1</p>
        </div>
    </div>
</body>
</html>
Create a copy of the above html file as app2.html and replace the following:
<p class="w3-large w3-center">Server: static-app1</p>
WITH
<p class="w3-large w3-center">Server: static-app2</p>
Create Docker Compose file
loadbalancer-docker-compose.yml
version: '3.9'

services:
  nginx-loadbalancer:
    # Apple M1 Chip
    platform: linux/amd64
    image: nginx:latest
    container_name: nginx-loadbalancer
    restart: always
    ports:
      - 80:80
      - 443:443
    volumes:
      - ./nginx-loadbalancer.conf:/etc/nginx/nginx.conf:ro
      - ./selfsigned.crt:/etc/ssl/certs/selfsigned.crt:ro
      - ./selfsigned.key:/etc/ssl/private/selfsigned.key:ro
    networks:
      - backend-network

  static-app1:
    # Apple M1 Chip
    platform: linux/amd64
    image: nginx:latest
    container_name: static-app1
    restart: always
    ports:
      - 8090:80
    volumes:
      - ./app1.html:/usr/share/nginx/html/index.html:ro
    networks:
      - backend-network

  static-app2:
    # Apple M1 Chip
    platform: linux/amd64
    image: nginx:latest
    container_name: static-app2
    restart: always
    ports:
      - 8092:80
    volumes:
      - ./app2.html:/usr/share/nginx/html/index.html:ro
    networks:
      - backend-network

networks:
  backend-network:
    driver: bridge
Start the Container
Now that we have our configuration and Docker compose file set up, it's time to start the container! Run the following command:
docker-compose -f loadbalancer-docker-compose.yml up -dThis will start the containers in detached mode, meaning they will run in the background.
Test Nginx Loadbalancer Container
Once the container is running, we can test our webserver by browsing to https://nginx.demo. You will observer that the response is rendered via both the servers in a round-robin fashion.
Optionally you can download the self signed certificate from
Chrome > Developer Tools > Security Tab > View Certificate
and import into MacOS System Keychain to Always Trust the self signed certificate and avoid the certificate warning.
Stop the Container
Finally, we can stop the containers by running the following command:
docker-compose -f loadbalancer-docker-compose.yml downThis will stop the containers and remove it from memory.
That's it! We've successfully created and configured a Docker Nginx container as a Loadbalancer along with SSL/TLS Termination and HTTP Redirect.

