MLflow Installation on AWS EC2

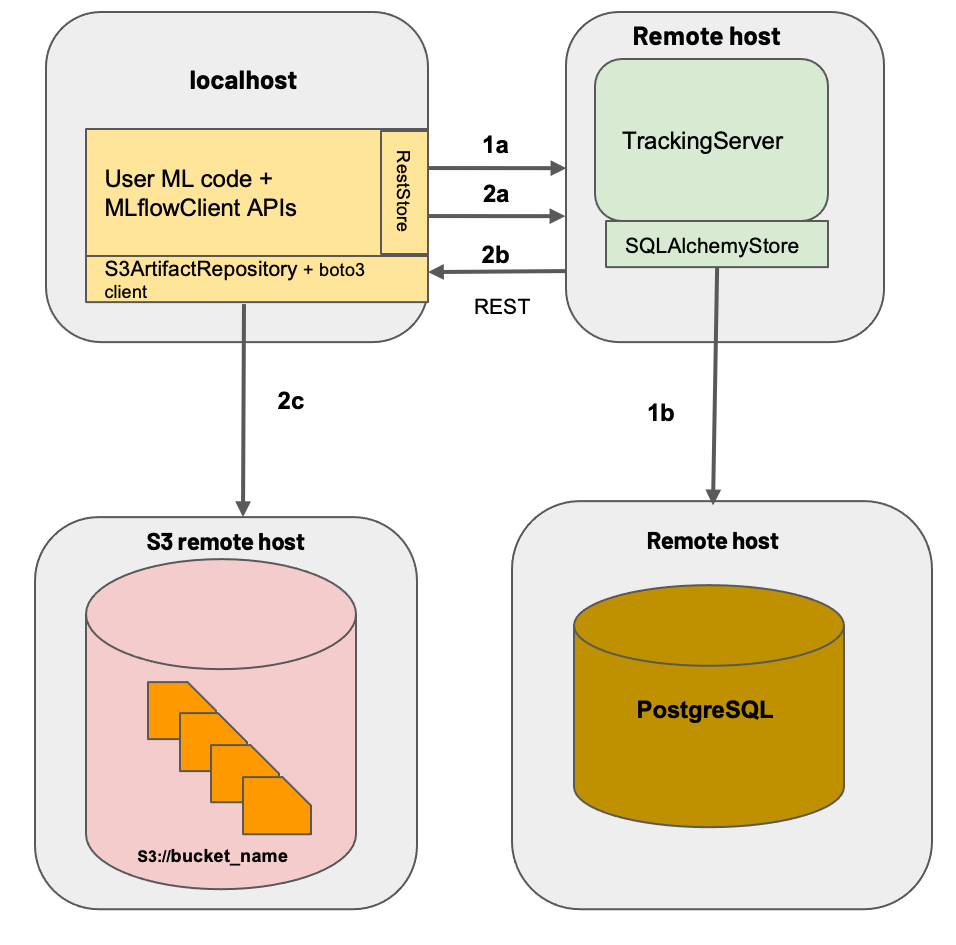
Are you looking for a comprehensive guide on how to install the MLflow tracking server in an AWS EC2 instance? Look no further! In this article, we will walk you through the process of setting up an MLflow tracking server in an EC2 instance, including creating an S3 bucket and assigning an IAM role.
Create an S3 Bucket & Assign an IAM Role
To start, create a new S3 bucket for storing MLflow artifacts. You can do this by navigating to the AWS Management Console and following these steps:
- Go to the S3 dashboard
- Click on "Create bucket"
- Enter a unique name for your bucket
- Choose a region for your bucket
Next, create an IAM role with read/write access to your S3 bucket. This will allow MLflow to store and retrieve artifacts from your bucket.
{
    "Version": "2012-10-17",
    "Statement": [
        {
            "Sid": "ListObjectsInBucket",
            "Effect": "Allow",
            "Action": [
                "s3:ListBucket"
            ],
            "Resource": [
                "arn:aws:s3:::mlflow-artifact-root-default"
            ]
        },
        {
            "Sid": "AllObjectActions",
            "Effect": "Allow",
            "Action": "s3:*Object",
            "Resource": [
                "arn:aws:s3:::mlflow-artifact-root-default/*"
            ]
        }
    ]
}
Install MLflow Tracking Server
To launch an EC2 instance, follow these steps:
- Go to the EC2 dashboard
- Click on "Launch instance"
- Choose an Amazon Linux 2 kernel 5.10 AMI (or a similar option)
- Configure the instance details as needed
- Security Group Inbound rules TCP protocol on port 5000 & 80
- Add the below script as part of User data while launching an EC2 Instance
- Also assign the IAM instance profile to the EC2 Instance

#!/bin/bash
# Name: mlflow_server.sh
# Owner: Saurav Mitra
# Description: Configure MLflow Server
# Amazon Linux 2 Kernel 5.10 AMI 2.0.20221210.1 x86_64 HVM gp2


POSTGRES_HOST=localhost
POSTGRES_PORT=5432
POSTGRES_DB=mlflow_db
POSTGRES_USER=mlflow_user
POSTGRES_PASSWORD=mlflow_pass


# Optional PostgreSQL in the same machine. You may use RDS/managed database #
# ~~~~~~~~~~~~~~~~~~~~~~~~~~~~~~~~~~~~~~~~~~~~~~~~~~~~~~~~~~~~~~~~~~~~~~~~~~~ #
# Install PostgreSQL (Optional)
sudo amazon-linux-extras enable postgresql14 > /dev/null
sudo yum -y install postgresql postgresql-server postgresql-contrib postgresql-devel > /dev/null
sudo pip3 install psycopg2-binary

# Configure Database
sudo postgresql-setup initdb
sudo systemctl enable postgresql
sudo systemctl start postgresql
sudo -u postgres psql -c "CREATE DATABASE ${POSTGRES_DB};"
sudo -u postgres psql -c "CREATE USER ${POSTGRES_USER} WITH PASSWORD '${POSTGRES_PASSWORD}';"
sudo -u postgres psql -c "GRANT ALL PRIVILEGES ON DATABASE ${POSTGRES_DB} TO ${POSTGRES_USER};"

sudo sed -i 's|host    all             all             127.0.0.1/32            ident|host    all             all             127.0.0.1/32            md5|g' /var/lib/pgsql/data/pg_hba.conf
sudo systemctl restart postgresql

# ~~~~~~~~~~~~~~~~~~~~~~~~~~~~~~~~~~~~~~~~~~~~~~~~~~~~~~~~~~~~~~~~~~~~~~~~~~~ #


# Install MLflow
cd /opt/mlflow
export MLFLOW_HOME=/opt/mlflow
sudo pip3 install mlflow
# sudo pip3 install scikit-learn
# sudo pip3 install boto3


# MLflow Setup
sudo mkdir /opt/mlflow
sudo mkdir /opt/mlflow/logs
chown -R ec2-user:ec2-user /opt/mlflow

sudo tee -a /etc/systemd/system/mlflow.service <<EOF
[Unit]
Description=MLflow Tracking Server daemon
After=network.target postgresql.service
Wants=postgresql.service
[Service]
StandardOutput=file:/opt/mlflow/logs/stdout.log
StandardError=file:/opt/mlflow/logs/stderr.log
User=ec2-user
Group=ec2-user
Type=simple
ExecStart=/usr/local/bin/mlflow server --host 0.0.0.0 --port 5000 --backend-store-uri postgresql+psycopg2://${POSTGRES_USER}:${POSTGRES_PASSWORD}@${POSTGRES_HOST}:${POSTGRES_PORT}/${POSTGRES_DB} --default-artifact-root s3://mlflow-artifact-root-default
Restart=on-failure
RestartSec=5s
PrivateTmp=true
[Install]
WantedBy=multi-user.target
EOF

sudo chmod 0664 /etc/systemd/system/mlflow.service
sudo systemctl enable mlflow.service
sudo systemctl start mlflow
This script optionally installs PostgreSQL as the MLflow Backend Store, configures the database, and sets up MLflow server. You may use AWS RDS instead for the Backend Store.
Testing the Remote Tracking Server
Local Machine Setup
To test the remote tracking server, follow these steps:
- Open a terminal on your local machine
- Set the following environment variables:
# Remote Tracking Server Details
export MLFLOW_TRACKING_URI=http://your_ec2_instance_ip:5000
export MLFLOW_ARTIFACTS_DESTINATION=s3://your_mlflow_s3_bucket
export AWS_ACCESS_KEY_ID=your_access_key
export AWS_SECRET_ACCESS_KEY=your-secret- Create a new directory for testing MLflow:
# Local Environment Setup
mkdir mlflow-testing
cd mlflow-testing- Activate a virtual environment
python3 -m venv env
source env/bin/activate- Install MLflow and other dependencies:
pip3 install mlflow
pip3 install boto3
pip3 install scikit-learn- Run the sample model training script:
# Sample Model Training
git clone https://github.com/mlflow/mlflow
cd mlflow/examples
python3 sklearn_elasticnet_wine/train.py
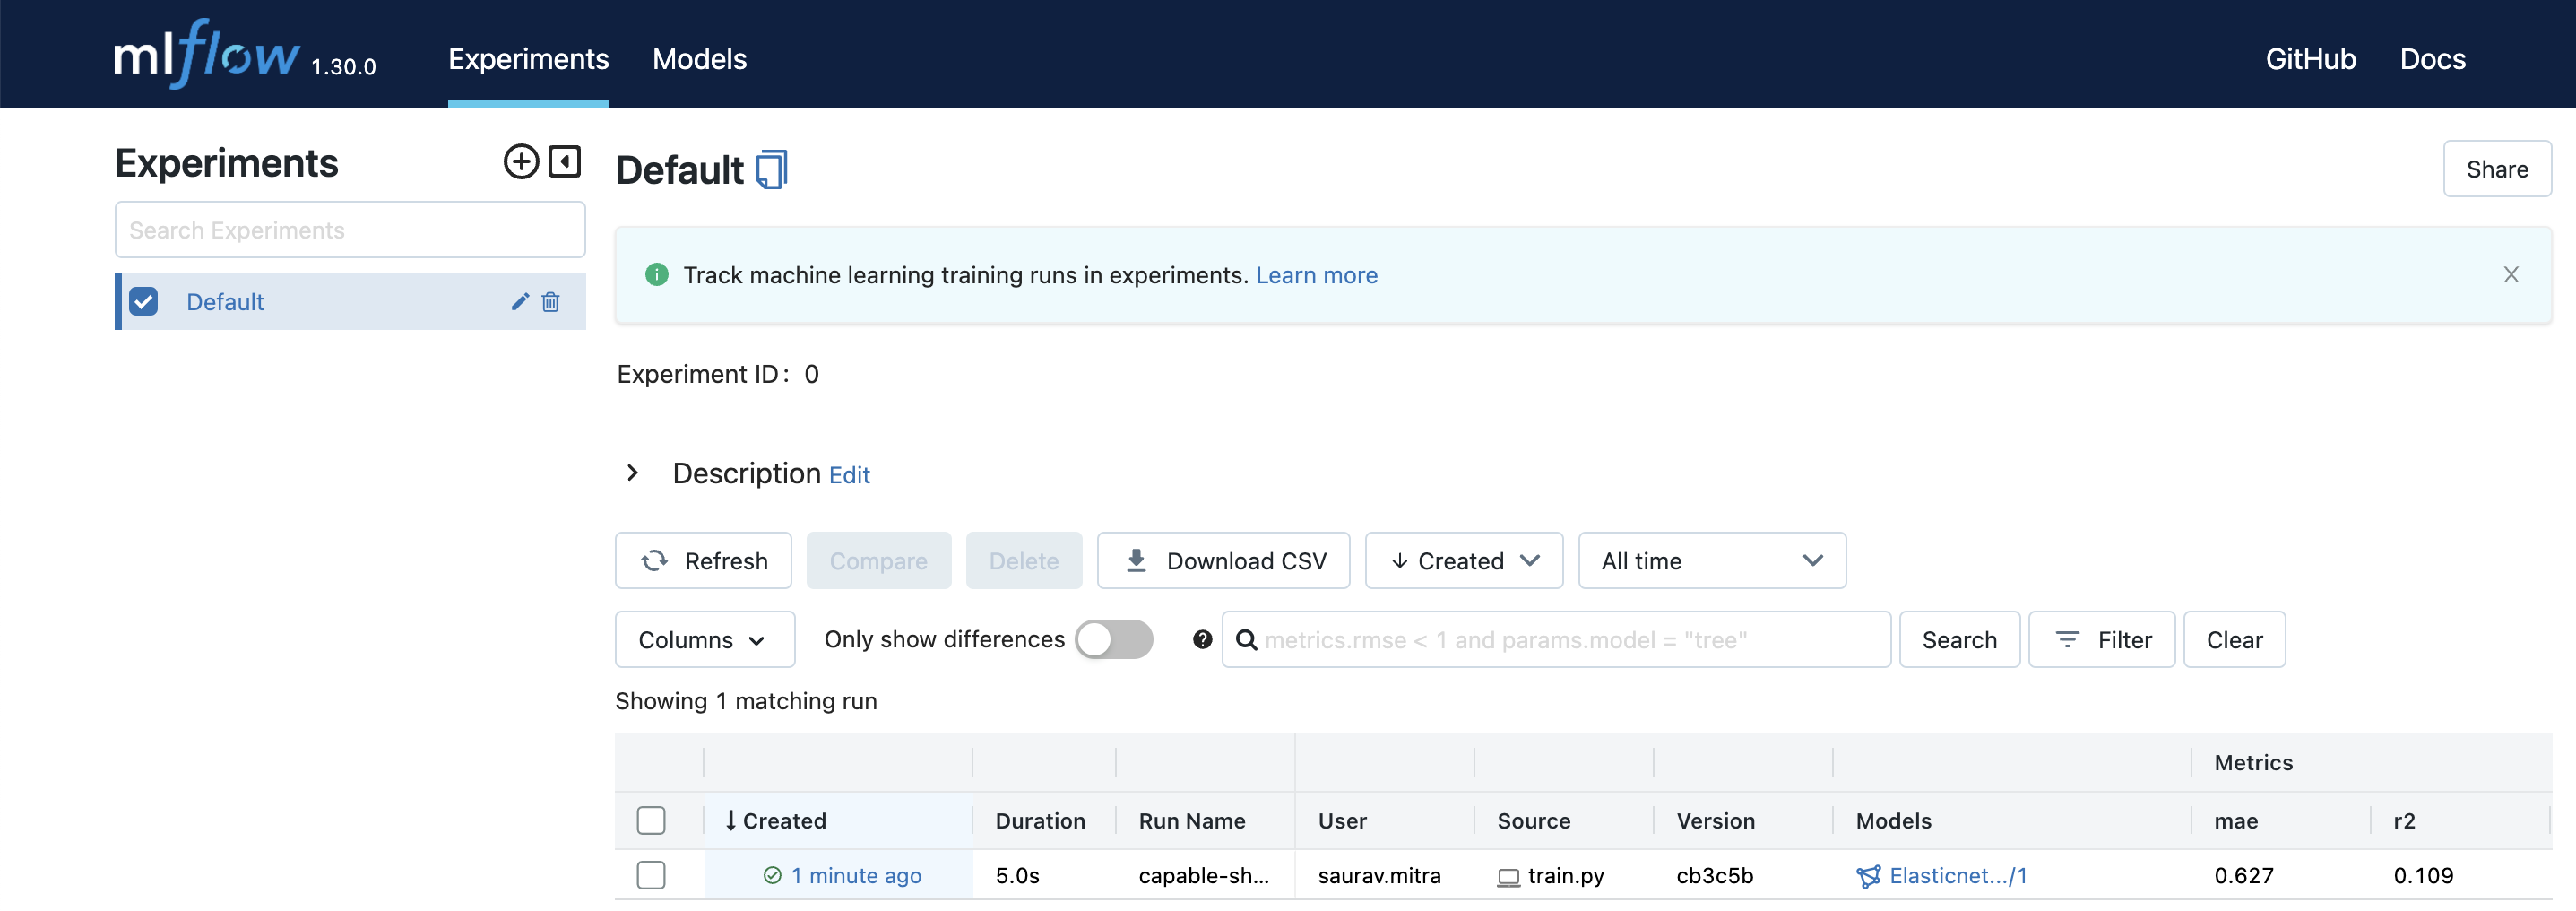
This should train a machine learning model using MLflow and store the artifacts in your S3 bucket.
Test MLflow running at default port 5000


In this article, we walked you through the process of setting up an MLflow tracking server on an EC2 instance. We created an S3 bucket, assigned an IAM role, launched an EC2 instance, installed MLflow, and tested the remote tracking server. With these steps, you should be able to set up your own MLflow tracking server and start using it for machine learning experiments.

